Archive | Growing Vegetables RSS feed for this section

I Think I’ll Try Artichoke

24 Mar

Each year I like to grow something new.  Even if I haven’t eaten it before, I find that if I grow it, and eat it fresh picked, I usually find myself falling in love with a new food.  This year I am going to grow artichoke for the first time.  What prompted this was a photograph I saw in a magazine of this beautiful vertically growing flower in a garden filled with brightly colored flowers.  Kind of a contemporary cottage garden feel, but these tall vertical plants didn’t have a bright flower on top; they had tall sturdy stems with more of a ball shaped flower.  I looked closer and saw that it was an artichoke.  It looked amazing in the garden, so even if I don’t eat it, the texture and visual appeal that it adds to the garden is worth learning how to grow this new plant.

artichoke

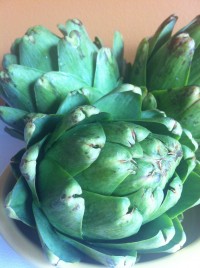
Globe Artichoke, Cynara scolymus L, is a member of the Sunflower Family.  Low in fat and higher than most vegetables in protein, this flower is a delicious treat.  I have tried it steamed and was taught to peel off the petals of the immature flower and scrape the fleshy portion along my bottom teeth, eating only this part and discarding the rest of the tough “skin”.  I was told that if I dipped it in mayo, it was even better.  This was new to me, tasted good, but I haven’t tried it since.  As far as world production, Artichokes are grown primarily in Italy, Spain, and Argentina.  So probably because it is not a very common vegetable at my local farmers market, artichokes fell off of my edible radar.

artichoke seed

artichoke seeds

Artichoke is a perennial to zone 7, but can be grown as an annual in cooler zones if you choose the right variety.  Artichokes bloom during their second year when grown as a perennial.  Eliot Coleman writes in his book The New Organic Grower that you can trick your plants by starting the seeds and growing them in warm conditions for 6 weeks, then placing them in cooler conditions for up to 6 weeks.  The plant will then think that it is a two year old plant.  I don’t have 12 weeks!   Johnny’s Selected Seeds suggests vernalizing  seedlings by planting them outside with nighttime temperatures of 50 degrees Fahrenheit for at least 6-8 days while also providing protection from frost. I am growing Imperial Star, which Johnny’s says is easiest to grow from seed. These should bloom in about 85 days.  I’ll try that since my frost free date is in about 7 weeks.  I am behind!  They will just mature later in the season if I can get them outside at the beginning of May.  The urgency I am feeling run through my veins is increasing each day!

Check your seed starting plan.  Next week is going to be a big one, but for now, get your artichoke seeds planted!

6166166013_jpg

New Favorites for 2013

6 Jan
Echinacea 'Cheyenne Spirit'photo courtesy AAS

Echinacea ‘Cheyenne Spirit’
photo courtesy AAS

Not only do I love getting the new garden catalogs for the year, I love to learn about the new varieties that are available.  Even though I have my favorites that I will forever plant year after year at My Urban Farmscape, I can’t wait for the season to begin so I can try something new.  I have already started my seed sowing calendar and have realized that it’s almost time to start the majority of my veggie, herb and flower seeds.  It’s this time of year when my family learns to deal with my obsession and continuous conversations with them (and sometimes, well mostly, with myself) about what gardening or plant related thoughts are in my head.

Really, just this morning I blurted out, “I need to get those seeds planted in the next few weeks if they are going to bloom this year.”

My husband’s eyes glazed over as he asked, “What are you talking about?”

“This Echinacea ‘Cheyene Spirit’  is absolutely beautiful, and I need to find a place grow a big patch of it, just a few feet, maybe five along the fence, and it should bloom the first year when planted from seed, but I have to get it sowed by the middle of this month.  Oh my!  Look at all the colors, red, pink, yellow, orange, purple and white which will grow really good in that hot sunny spot next to the house.  Oh!  The bees and butterflies will LOVE them, I can see that late summer cut flower bouquet now..…..”  I realized he wasn’t listening, but continued to talk out loud to myself.  “It’s also one of the 2013 All-American Selection winners!”

Tomato 'Jasper'photo courtesy AAS

Tomato ‘Jasper’
photo courtesy AAS

My excitement continued with another 2013 AAS winner that was bred by Johnny’s Selected Seeds.  A bright red cherry tomato ‘Jasper’, an F1 hybrid which is also certified organic.  Nice!  An intermediate growing cherry tomato needing to be staked which should produce fruit 90 days from sowing seeds.  Johnny’s and AAS described the flavor having a “sweet, rich taste”.  I think that I need to try this one.  I’m sure I can fit it in somewhere.

Now thinking about tomatoes reminded me about the grafted tomato plants available from Burpee.  I called out to my husband, “Can you believe they are grafting tomatoes like they graft fruit trees?!”  No response.  I have found this to be very interesting, reading about it for the past few years and decided this is the year to buy a few plants.  Simply put, an heirloom variety is the plant on the top, so you get the delicious heirloom flavor, but the roots are from a hybrid that will provide increased disease resistance.  Wow!  The original pink Brandywine will be my first choice.  You can purchase these directly from Burpee.com or possibly your local garden retailer.

Burpee's 'Bumper Crop' grafted tomatophoto courtesy Burpee

Burpee’s ‘Bumper Crop’ grafted tomato
photo courtesy Burpee

I came across a new heirloom pickling cucumber ‘Miniature White’ from Baker Creek Heirloom Seeds.  Not only is the flesh a creamy white, but the skin is also a creamy white.  That should look nice against the green foliage.  I thought that this may make an interesting addition to the garden as they say it is a high producer and grows good in a container.  I was even more excited when I read about it seldom growing more than 3 feet!  A true bonus for any Urban Farmscape.  I became distracted wondering what color container I should plant it in and decided to go outside and rummage around the garage.  I could always paint it if I didn’t have the right color.  Orange?  Maybe purple.  That would really stand out.  Not too many purple things in the garden.  I don’t know.  I decided to go in and ask my husband what color he thought would look good.  I don’t know if he’ll respond, but I know that at least he’ll smile.

Garden Do Over

22 Jul

“If I could do it over again….” That’s what I’ve been hearing in my garden conversations this week. The second part of the sentence is usually, “well there’s always next year”. Whether you are experiencing draught conditions, floods, weeds, bugs, diseases, overgrown plants, flopping tomato plants, gigantic zucchini or maybe you are just tired of the heat, don’t stop now. It’s time to plant again! Hooray! Right? Okay, maybe you aren’t as excited as I am with the thought of starting another garden in July, but really, it’s time to sow seeds for your autumn or winter garden. I know, I know, you are TIRED of working in the outdoors in temperatures over 90 degrees. Urban Farmerscapers don’t have the option to stop farming, just like our full time farmers don’t have the option to stop growing food for us. So, here are a few tips for your Garden Do Over.

Roma tomato before pruning

Stake and Prune. If you haven’t already, stake and prune any tomatoes or climbing veggies. Consider this the “Last Call”. Don’t be afraid to cut off the lower branches of tomatoes to ensure they stay up off the ground. If you are growing indeterminate types, the use of a stake is best. The taller the better. Prune all lower branches up to the first set of buds, or maybe fruit by now. Farmers are using trellising techniques that can hold these tomatoes up so high that a ladder is needed to harvest!

Roma tomato after pruning

Remove plants. There’s nothing wrong with pulling out a plant that has taken over or has gone to seed. I should have never planted this Clarey Sage in the space that I did, but I never grew it before, so I didn’t know better. We learn from our mistakes. I harvested the seeds and now I have space to plant some Cilantro or Parsley! Much better choices for My Urban Farmscape.

Harvest efficiently then replant. As soon as you are done harvesting all of the fruit in one area, prepare for your autumn garden. You should add equal amounts of greensand, colloidal rock phosphate, and blood meal. I use 5 pounds of each for every 100 sq ft., adding half at spring planting and the other half in the summer. Also add compost at this time. Then after “resting” for a week, re-plant you fall crop, making sure not to plant something from the same family. Here is a list of plants by family for your reference, along with notations for what you can plant in the fall.

Vegetables by Family

Plant a cover crop. If you have decided that your Urban Farmscaping days are over this year, then make sure you plant a summer cover crop to build soil and help eliminate weed volunteers. A good one is soybean, and for later, as the season cools, you could add some clover. Then make sure you shop at your local farmers market each week.

Eat your veggies!

Take good notes. I hope that you are taking notes of what worked, what didn’t, what you could do next year. I make comments on each plant, how it performed, how much I harvested from each plant, how many plants I planted, what varieties, disease or insect problems, dates of planting and harvesting. But most important, I write notes on whether it tasted good or not. That’s why we garden right? YUM! It’s full swing harvest season! How could you call it quits? Maybe you don’t need to do a whole do over, but maybe a spruce up and a re-plant. Need more inspiration? Read my post from exactly 6 months ago, January 22, 2012 titled “Winter Carrots”. YUM! Here’s a quick link.

https://myurbanfarmscape.com/2012/01/22/winter-carrots/

So… what’s YOUR problem?

8 Jul

Remember in the spring, when the warm weather and sunshine felt so good, and how much fun it was planting seeds and plants in the garden?  Remember how that vision of germinating beans pulled at your heartstrings, so proud of yourself, you paused in amazement with life.   Visions of organic veggies and fresh-cut flower bouquets filled your mind along with sharing your bountiful harvest with family and friends.  Life is good you told yourself.  Then you went on vacation for a week, fun and sun, and when you returned home, the first thing you did was run to your garden, arms wide open, excited and shouting to all of your garden plants, “I am home!”  As you get closer, you see wilting chard plants, holes in the cauliflower leaves, the weeds have taken over your pepper patch, and where did that giant zucchini come from?  Oh my!


No matter where you garden or what you grow, you are going to have problems.  When you work every day, every other day, or even once a week in a garden, you start to get to know the plants.  You start to understand their feelings when they aren’t getting enough rain, or there are too many clouds, they weep, they really do.  Ok, maybe it’s not what they are feeling, but you know they aren’t happy.  What about bugs?  How many bugs are okay to have chomping away on your plants leaves?  One, two, ten, none?   Are they good bugs or bad bugs?  The first thing that you need to do is to determine if there is a problem or not. 


Scenario # 1:  I noticed that the cauliflower didn’t look too good this week.  The leaves were becoming all curly, weird, somewhat distorted.  I only have 4 plants in the brassica family in my garden, because I don’t like any of them, I don’t like to grow them, but I did plant these 4 for my family, because they like them.  Anyway, yes, maybe I ignore these plants a little, but I couldn’t help but investigate a little more.  So, upon a closer look, what I found rolled up in the center leaves were disgusting little creatures.  Problem or not? 

In this scenario, upon further investigation, I can see that I am dealing with aphids.  Aphids LOVE to suck on plant juices which will eventually kill it.   You will always find them at the newest growth.  Their natural enemies are lady bugs, but I haven’t seen any of those around.  For now, I will spray and wash the plants with soapy water and smash them with my fingers.  Watch them daily, and if they continue, start to use insecticidal soap per directions.  This should take care of the problem, but you have to stay on it.  You can’t let this go.  They multiply fast!  Or, I could pull them out of my garden….but then my family would be upset.

Scenario # 2:  On one of my tomato plants the leaves have been curling in an upward way.  Almost to the point where they look like a tube.  I can see that the little cherry tomatoes are developing okay, and noticed that the other tomato plants next to it didn’t look the same.  They are different varieties, but the leaves just looked odd.  Maybe they have a virus or something.  Problem or not?

It appears that the plant is expressing a physiological disorder.  No virus or disease problems, no insects, just a possibility that it has been too hot and this is what the plant is doing to deal with it.  I found a good explanation at http://agdev.anr.udel.edu/weeklycropupdate/?p=3228  so no need to do anything.

Scenario # 3:  While I was crawling around my squash plants weeding, I noticed these little metallic brown balls on the leaves.  I found some on the tops of leaves, and also on the bottoms of some others.  They look harmless, and don’t seem to be doing anything but sitting there.  For now I will just leave them and hope to remember to keep an eye on them.  Problem or not?

These “little balls” are actually eggs of squash beetles.  You can smash them as soon as you see them.  That’s easy for an Urban Farmscaper to do, but not for a large-scale farmer.  I found some really good information on how to deal with these and other cucurbit eating bugs from Clemson: http://www.clemson.edu/extension/hgic/pests/plant_pests/veg_fruit/hgic2207.html

I like to use deterrents such as hot pepper wax spray or garlic spray initially to keeps pests away from the garden.  They are bound to find their way in there.  If you suspect a problem,  the first thing you need to do is  observe the symptoms, identify the pest, and know when it is a problem and when to act.  This is also known as Integrated Pest Management, or IPM.  If you aren’t already practicing IPM, learn more at the Michigan State University IPM website. http://www.ipm.msu.edu/  Knowing if there is a problem is the first step, and how to deal with it in a sustainable manner is the next step to having a healthy garden with a bountiful harvest.   So..what’s YOUR problem?

Planting the Summer Garden

20 May

When the nighttime temperatures are consistently above 50 degrees here in Michigan, I know it’s finally a safe time to plant the warmer summer season crops such as beans, squash, cucumbers, corn and tomatoes. This next week the temperatures are going to be very warm, so with a little water, seeds should germinate quickly and transplants should root in nicely.

planting bean seeds

When planting seeds, make sure you follow the directions on the package. As a general rule, you will plant a seed as deep as up to twice its diameter. For instance, you plant beans about 1″ deep. Some seeds you may just sow directly on top of the soil and barely cover. The most important part when planting seeds is that you keep the soil moist until it has germinated and is growing. If the root begins to emerge from the seed, and it dries up before it is able to become established in the soil, it’s a gonner.

loosing the rootball on this tomato plant

When transplanting vegetables or flowers to your garden, make sure you loosen the rootball of the plant and bury it in the soil at the same level it was growing in the container.

This rule can be broken for tomatoes, which when planted deeper in the soil, burying a leggy stem, will develop more roots on the soil covered stem, which is better for the tomato plant overall.

planting tomatoes to encourage additional root development

Even though we have reached our frost free date, and the nighttime temperatures are consistently over 50, I will wait another week or two to plant basil, eggplant, and some of my favorite peppers. I don’t want to take any chances and these plants really like to grow in warmer temperatures.

So when planting, keep in mind the following five tips:

  1. Make sure you know how deep to plant the seed or transplant
  2. Check the seed packet to see how far apart to place each seed  (or plant).
  3. Lightly pat the soil around the plant.  Don’t smash or compact the soil. 
  4. Water thoroughly and continue to check daily for watering.  Keep moist, but not soggy. 
  5. Label each planting with the name and date planted.  Then you can estimate the time of harvest.  Yum!

Happy Planting!


Arugula

25 Mar

Arugula, Eruca sativa, belongs to the Brassicaceae family.  In the U.S. it is grown as an annual leafy green which provides a pungent bitter flavor used in salad mixes.  In Europe, where it is most common, it is sold as an herb. Arugula prefers to grow during the cooler seasons of spring and fall but there are a few varieties that will tolerate the summer heat and are slower to bolt.  Bolting is a term used meaning “to flower”.  Some plants will “bolt” to flower quickly when conditions tell the plant to hurry to flower and make seed.  Most cool season crops will bolt during warmer seasons.  So planting arugula in June might not be the best time unless you are growing it to collect seed.  It doesn’t overwinter, but its wild cousin, Sylvetta, Diplotaxis tenuifolia is slower growing and will grow well with winter protection such as in a cold frame.  The leaves are more lobed and tastes less pungent than arugula, but is more highly sought after by chefs according to Johnny’s Selected Seeds. 

Arugula should be directly sown in average garden soil, but you can start it indoors then transplant it outside.  Eliot Coleman suggests planting seeds directly in the soil 1 inch apart in rows 6 inches apart.  You can start arugula in a cold frame in late February.  Ideal germination is about 65-68 degrees (Fahrenheit).  Once germinated and the first true leaves are present, it will grow outdoors unprotected at 40 degrees.  The best temperature range would be 50-65.  Sowing every 2 to 3 weeks through the spring will ensure a continuous harvest. 

To harvest, you just use a pair of scissors and cut at the soil line.  You can have baby arugula in about 21 days, and full size leaves in about 40 days.  It’s best to harvest first thing in the morning.  Wash with cold water, and store any excess in the refrigerator.  Using a salad spinner is really helpful in eliminating excess water which will improve the storage quality, but its best eaten fresh. 

Plan your salad mixes by growing the leafy greens you love.  Mix and match, add baby lettuces, spinach, and arugula.  The possibilities are endless!


Spinach

4 Mar

Spinach, Spinacia oleracea L., belongs to the Chenopodiacea family, a.k.a., Goosefoot family where it originated in Central and Southwest Asia. An annual in our garden where it prefers to grow during the cooler seasons of spring and fall. The leaf types of spinach are either “smooth” which is somewhat flat like in this picture, or “savoy” which is wrinkly looking. In the warmer months it will “bolt” which means it will quickly produce it’s flower to make seed, thus slowing down leaf production, which is the part of spinach we like to eat. If you choose to collect seed though, summer is the best time to do that. Whether prepared fresh (my preferred method) or cooked, Americans consumed about 1.8 pounds per person per year in 2004. As far as world production of spinach at that time, China grew the most, followed by the U.S. and then Japan. Spinach is made up of about 91% water, and nutritionally, per a 100 gram serving, spinach provides about 2.9 g of protein, 0.4g fat, 3.6 g carbs, 2.2 g fiber, 99 mg calcium, and 2.27 mg iron. Go Popeye! Long ago in England it was said that spinach was used as a dye for Easter Eggs.


spinach seed

You can plant spinach as soon as the soil is workable or right now if you have a cold frame or low tunnel. Seeds will germinate in 5-6 days with soil temperatures about 70 degrees, 12-23 days with soil temps at 40-50 degrees, and up to 63 days at 32-39 degrees. I like to start my spinach indoors to ensure quick germination and then transplant outside about 2-3 inches apart in rows 8-12 inches apart. When the soil temperature gets above 50, I’ll sow seeds directly in the soil. Lately it has been hovering around 40 degrees in my cold frame.


Spinach prefers full sun but will tolerate some shade. Maintain a soil pH of 6-6.8. Spinach prefers to grow with an air temperature ranging from 40 degrees Fahrenheit to a maximum of 75. It is not susceptible to chilling injury which makes it a good pick for a fall/winter/spring crop. When grown under ideal conditions, you will be able to harvest leaves when mature about 37-45 days. It is best to harvest in the morning, wash, and store what you don’t eat in the refrigerator. In Eliot Coleman’s book, Four-Season Harvest he recommends the varieties “Tyee” for spring, “Steadfast” for summer, “Space” for autumn, and “Space” or “Winter Bloomsday” for winter. I have grown “Space” and “Tyee” and have been very happy with them both.

Starting to plant my early spring crops means that the gardening season is beginning! Even though we are experiencing the coldest temperatures and the most snow we have had all winter, my head is busy in the garden. I wonder if this is a disorder of some type. My family would say so. If you haven’t already, make sure you check out the garden planning tools at GrowVeg.com

My Urban Farmscape Winter Garden

%d bloggers like this: