Tag Archives: how to make

Building a Cold Frame

16 Sep

I was driving around northern Michigan today and noticed some of the leaves starting to change color. Then I realized that with the first frost date rapidly approaching, it was time to think about protecting my garden. Plants such as basil and peppers won’t tolerate temperatures below 50 degrees Fahrenheit let alone a frost. I suddenly felt the urgent need to harvest everything before it was too late.

You can extend your growing season long into the fall, maybe into winter in a small unheated greenhouse or cold frame for some crops such as carrots, beets, spinach and arugula. Remember how early spring came? I got so tired of covering and uncovering plants. Hot, cold, hot cold. Well, nighttime temperatures are what you need to pay close attention to now, and the covering and uncovering is about to start again. If it is going to dip down below that magic 50 degrees, protect your warm season vegetables like tomatoes which can tolerate an occasional dip, but then you will start to notice how the fruits stop maturing and they aren’t turning red. Best to pick them and make some fried green tomatoes. If you want to seriously continue to garden and save what you can, you can build a simple cold frame. WARNING!!! You can now cook your cool season crops on a sunny day. So not only do you need to keep them warm at night, you need to keep them cool on a sunny day. For now, protect with newspaper or lightweight fabric such as a frost cloth which is available from Johnny’s Selected Seeds. Protect this way on these occasional frosty nights, and prepare for colder temperatures by building a simple cold frame like I did here.

I cut 1/2 inch PVC pipes 10 feet long. Since my beds are raised it was easy to push them into the ground on one side. The bed that I am working on is 4 feet by 8 feet. I have equally spaced 5 PVC pipes (you only see part of it here).

I bent the PVC around and pushed into the ground on the opposite side of the bed.

I secured the PVC to the inside of the raised bed using this galvanized piece.

Then I used zip ties to secure an 8 foot pipe to the top. I would recommend adding a screw to prevent it from sliding down the sides.

Cover with poly. Here I used a horticultural grade poly that I had left over from a greenhouse we built at our farm. You can buy this at greenhouse supply companies or catalogs like Farm-Tek. More light penetrates, which is important for plant growth and development.

Notice how transparent it is.

This was an inexpensive alternative using painters plastic from the hardware.

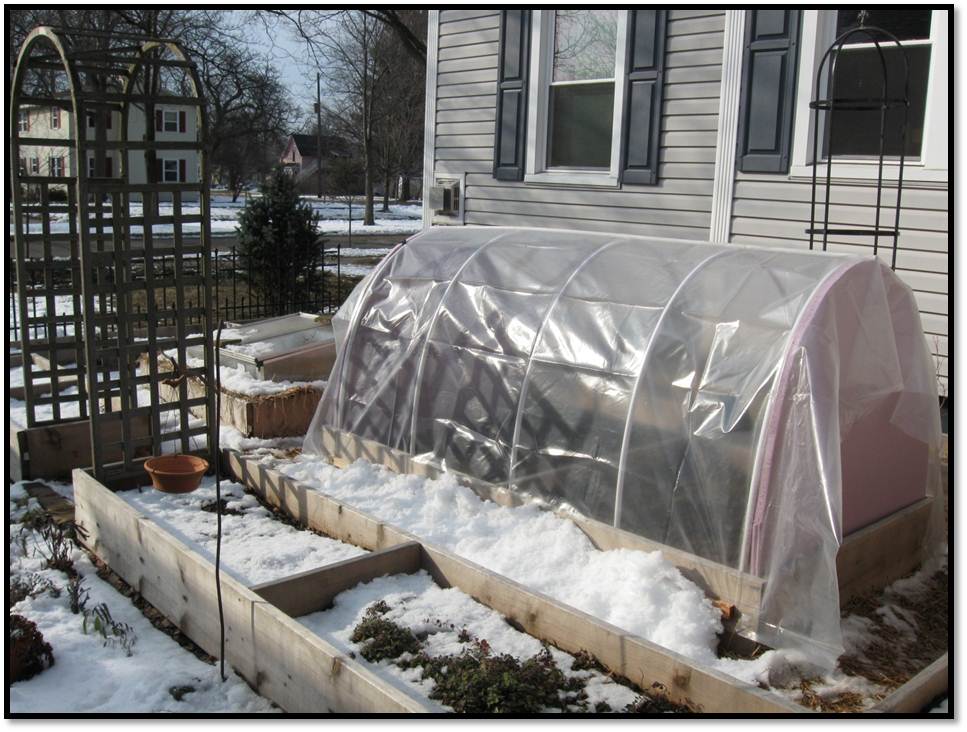
For finishing touches, you can use scrap pieces of wood screwed to the bed frame to secure the poly at the bottoms. I used pink foam insulation pieces for the ends to make it easier to remove on sunny days to prevent the temperatures from getting too high.

This was the simplest and most inexpensive way that I came up with to make a cold frame. There are many other options to explore whether you want to protect your crops, extend your season, or get a jump on next year. Click on the Grow Veg link to the right, or below on the links to go to Amazon for my favorite books to learn more. Or the last link to a Juwel Cold Frame like the one you see in the background of the above picture. This is one of my favorite cold frames. Just ignore the snow for now. We still have a lot of time before that gets here.

Four-Season Harvest: Organic Vegetables from Your Home Garden All Year Long

The Year-Round Vegetable Gardener: How to Grow Your Own Food 365 Days a Year, No Matter Where You Live

Juwel Cold Frame 1000

Contained Chaos

18 Mar

My gardening style is what I like to call, Contained Chaos.  I like the look of wildflowers growing in nature, but I also like neatly arranged plants, like using boxwood as a border, or rows of plants like grown in a farm field or orchard.  I think that’s why when I designed the culinary garden at My Urban Farmscape, I wanted my veggies to be planted in raised beds.  Each raised bed is laid out in neatly arranged patterns providing several individual sections to grow my veggies, fruits and herbs.   But that doesn’t mean that when the plants start growing outside of thier boundaries I want to hold them back.  They are allowed to wander and intermingle as much as they like.  It’s like, I try to control them, but then I give up because I know they will grow where they want.  Plants have a mind of their own right, or maybe, the instinct and desire to follow the sun.

When I decided to make my raised beds, I researched the options and chose to make them with 2” x 12” pine lumber.   DO NOT use treated lumber of any kind for growing anything edible.  I looked into options for preserving the wood, but then realized that the wood I chose will last a very long time, and by the time it was rotted, I would have gotten my money’s worth just using the plain pine and it wasn’t worth the added expense.  So, here is what I did.

April Garden

This is the space between my house and the driveway.  It is the sunniest space in the yard, which is what I needed for the culinary garden.  So…..out with the old and in with the new!  I didn’t remove the lawn though.  No need, since 10” of soil would be on top of it, it won’t grow any more.  I did have to transplant the shrubs and cut down an ornamental tree. 

The 2” x 12” boards were cut to the desired lengths.  If you don’t have a saw, you can ask your lumber store to cut them to the lengths you want.  They will typically do this at no charge.  It is easy to ask them to cut a 2” x 12” by 8’ board in half.  Do this for two boards and you will end up with a 4’ x 4’ garden.  I chose to use 3” deck screws to screw them together.  There are fancy type corners you can get, but it was getting a little too expensive for my garden.  Some of my beds are 2’ x 8’ or longer, so I added a board in the center for additional strength and/or to keep it from bowing.

Autumn Garden Showing Raised Bed Design

Once the boxes were made, they were place directly on the ground.  I filled them about 3/4 full with topsoil.  If you don’t have access to free topsoil, then try to purchase it by the yard.  It is cheaper.  Otherwise, you will have to buy it by the bag.  A 4’ x 4’ box takes about 1/3 yard of topsoil to start.  I then mixed in compost to the remaining portion, ending a couple inches from the top.   My cost for a 4’ x 4’ garden last summer was about $25.00 each.  That is the wood and the topsoil and compost.  You can make these any size you like, and they will fit in most every Urban Farmscape.  These will last for years.  If the ends start to come apart or the boards warp, I will make small adjustments as they come.  I just found this method to be the most practical and affordable. 

September Garden

The first year I was able to harvest a bushel of tomatoes from a 2’ x 12’ raised bed.  I spaced the tomatoes diagonally about 2’ apart.  So in a 2’ x 4’ space I was able to plant 3 tomato plants.  They were indeterminate types which I pruned and staked them.  I will talk about that more when I write about tomatoes.  I also planted blueberries, corn, cucumbers, carrots, peppers, squash, beans, garlic, parsley, oregano, basil, sage, thyme, and several edible flowers.  I planned space for cold frames also.  I overwintered carrots under straw (see poem on Winter Carrots).

Winter Garden

This will be the second season for the culinary garden at My Urban Farmscape.  The warm weather we have been experiencing has made it EASY to clean up and prep my gardens, but the only thing I am planting are my cool season crops such as spinach, arugula, lettuce, carrots, beets, and radishes to name a few.  And that is still in my cold frame (open ends and tops off for now).  Don’t be fooled by Mother Nature!  Our frost free date is about May 15th, still a long ways away.  For now, continue planning and if you like your garden chaos contained like I do, start building your raised beds!  Before you know it, it will be time to plant for the summer!

Coming soon to a garden near you…

%d bloggers like this: